副标题#e#
说实话,原来我是没有规划放一个很大的例子的,一则较量巨大,二来或者需要许多次才气说得完。不外,此刻已经说完了画图部门,所以打算照旧上一个这样的例子。这里我会只做出一个简朴的画板措施,概略上就是可以或许画直线和矩形吧。这样,我打算分成两种实现,一是利用普通的QWidget作为画板,第二则是利用Graphcis View Framework来实现。因为前面有伴侣说不大大白Graphics View的相关内容,所以打算如此。
好了,此刻先来看看我们的主体框架。我们的框架照旧利用Qt Creator建设一个Gui Application工程。
简朴的main()函数就不再赘述了,这里首先来看MainWindow。顺便说一下,我一般不会利用ui文件,所以这些内容都是手写的。首先先来看看最终的运行功效:
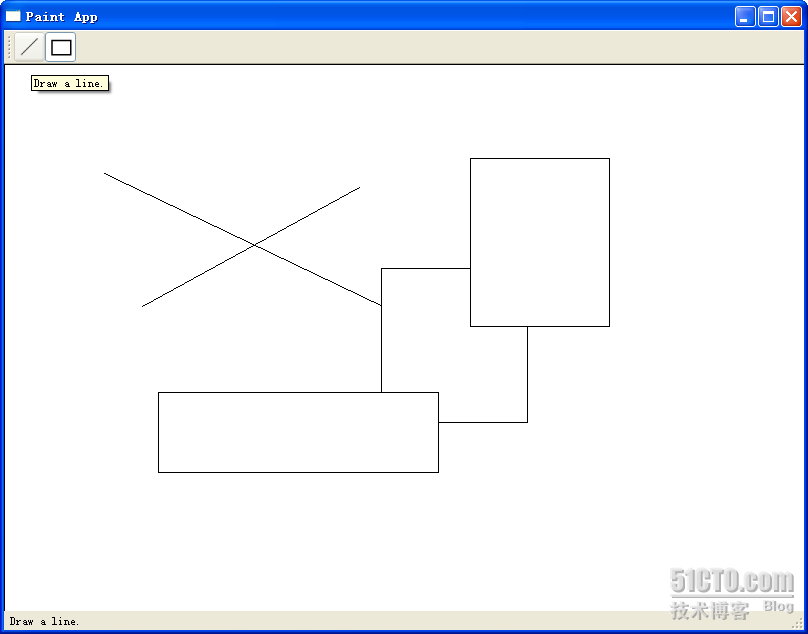
或者很简朴,可是至少我们可以或许把前面所说的各类常识串通起来,这也就到达目标了。
此刻先来看看MainWindow的代码:
mainwindow.h

#ifndef MAINWINDOW_H

#define MAINWINDOW_H

#include <QtGui>

#include "shape.h"

#include "paintwidget.h"

class MainWindow : public QMainWindow

{

        Q_OBJECT

public:

        MainWindow(QWidget *parent = 0);

signals:

        void changeCurrentShape(Shape::Code newShape);

private slots:

        void drawLineActionTriggered();

        void drawRectActionTriggered();

};

#endif // MAINWINDOW_H
mainwindow.cpp
#include "mainwindow.h"
MainWindow::MainWindow(QWidget *parent)
: QMainWindow(parent)
{
QToolBar *bar = this->addToolBar("Tools");
QActionGroup *group = new QActionGroup(bar);
QAction *drawLineAction = new QAction("Line", bar);
drawLineAction->setIcon(QIcon(":/line.png"));
drawLineAction->setToolTip(tr("Draw a line."));
drawLineAction->setStatusTip(tr("Draw a line."));
drawLineAction->setCheckable(true);
drawLineAction->setChecked(true);
group->addAction(drawLineAction);
bar->addAction(drawLineAction);
QAction *drawRectAction = new QAction("Rectangle", bar);
drawRectAction->setIcon(QIcon(":/rect.png"));
drawRectAction->setToolTip(tr("Draw a rectangle."));
drawRectAction->setStatusTip(tr("Draw a rectangle."));
drawRectAction->setCheckable(true);
group->addAction(drawRectAction);
bar->addAction(drawRectAction);
QLabel *statusMsg = new QLabel;
statusBar()->addWidget(statusMsg);
PaintWidget *paintWidget = new PaintWidget(this);
setCentralWidget(paintWidget);
connect(drawLineAction, SIGNAL(triggered()),
this, SLOT(drawLineActionTriggered()));
connect(drawRectAction, SIGNAL(triggered()),
this, SLOT(drawRectActionTriggered()));
connect(this, SIGNAL(changeCurrentShape(Shape::Code)),
paintWidget, SLOT(setCurrentShape(Shape::Code)));
}
void MainWindow::drawLineActionTriggered()
{
emit changeCurrentShape(Shape::Line);
}
void MainWindow::drawRectActionTriggered()
{
emit changeCurrentShape(Shape::Rect);
}
#p#副标题#e#
应该说,从以往的进修中可以看出,这里的代码没有什么奇怪的了。我们在MainWindow类内里声明白一个信号,changeCurrentShape(Shape::Code),用于按钮按下后通知绘图板。留意,QActio的triggered()信号是没有参数的,因此,我们需要在QAction的槽函数中从头emit我们本身界说的信号。结构函数内里建设了两个QAction,一个是 drawLineAction,一个是drawRectAction,别离用于绘制直线和矩形。MainWindow的中心组件是PainWidget,也就是我们的绘图板。下面来看看PaintWidget类:
#p#分页标题#e#
paintwidget.h

#ifndef PAINTWIDGET_H

#define PAINTWIDGET_H

#include <QtGui>

#include <QDebug>

#include "shape.h"

#include "line.h"

#include "rect.h"

class PaintWidget : public QWidget

{

 Q_OBJECT

public:

 PaintWidget(QWidget *parent = 0);

public slots:

 void setCurrentShape(Shape::Code s)

 {

  if(s != currShapeCode) {

   currShapeCode = s;

  }

 }

protected:

 void paintEvent(QPaintEvent *event);

 void mousePressEvent(QMouseEvent *event);

 void mouseMoveEvent(QMouseEvent *event);

 void mouseReleaseEvent(QMouseEvent *event);

private:

 Shape::Code currShapeCode;

 Shape *shape;

 bool perm;

 QList<Shape*> shapeList;

};

#endif // PAINTWIDGET_H
paintwidget.cpp
#include "paintwidget.h"
PaintWidget::PaintWidget(QWidget *parent)
: QWidget(parent), currShapeCode(Shape::Line), shape(NULL), perm(false)
{
setSizePolicy(QSizePolicy::Expanding, QSizePolicy::Expanding);
}
void PaintWidget::paintEvent(QPaintEvent *event)
{
QPainter painter(this);
painter.setBrush(Qt::white);
painter.drawRect(0, 0, size().width(), size().height());
foreach(Shape * shape, shapeList) {
shape->paint(painter);
}
if(shape) {
shape->paint(painter);
}
}
void PaintWidget::mousePressEvent(QMouseEvent *event)
{
switch(currShapeCode)
{
case Shape::Line:
{
shape = new Line;
break;
}
case Shape::Rect:
{
shape = new Rect;
break;
}
}
if(shape != NULL) {
perm = false;
shapeList<<shape;
shape->setStart(event->pos());
shape->setEnd(event->pos());
}
}
void PaintWidget::mouseMoveEvent(QMouseEvent *event)
{
if(shape && !perm) {
shape->setEnd(event->pos());
update();
}
}
void PaintWidget::mouseReleaseEvent(QMouseEvent *event)
{
perm = true;
}
PaintWidget类界说了一个slot,用于吸收改变后的新的ShapeCode。最主要的是,PaintWidget重界说了三个关于鼠标的事件:mousePressEvent,mouseMoveEvent和mouseReleaseEvent。
我们来想象一下如何绘制一个图形:图形的绘制与鼠标操纵息息相关。以画直线为例,首先我们需要按下鼠标,确定直线的第一个点,所以在 mousePressEvent内里,我们让shape生存下start点。然后在鼠标按下的状态下移动鼠标,此时,直线就会产生变革,实际上是直线的终止点在跟着鼠标移动,所以在mouseMoveEvent中我们让shape生存下end点,然后挪用update()函数,这个函数会自动挪用 paintEvent()函数,显示出我们绘制的内容。最后,当鼠标松开时,图形绘制完毕,我们将一个符号位置为true,此时说明这个图形绘制完毕。
为了生存我们曾经画下的图形,我们利用了一个List。每次按下鼠标时,城市把图形存入这个List。可以看到,我们在paintEvent()函数中利用了foreach遍历了这个List,绘制出汗青图形。foreach是Qt提供的一个宏,用于遍历荟萃中的元素。
最后我们来看看Shape类。
shape.h

#ifndef SHAPE_H

#define SHAPE_H

#include <QtGui>

class Shape

{

public:

 enum Code {

  Line,

  Rect

 };

 Shape();

 void setStart(QPoint s)

 {

  start = s;

 }

 void setEnd(QPoint e)

 {

  end = e;

 }

 QPoint startPoint()

 {

  return start;

 }

 QPoint endPoint()

 {

  return end;

 }

 void virtual paint(QPainter & painter) = 0;

protected:

 QPoint start;

 QPoint end;

};

#endif // SHAPE_H
shape.cpp
#include "shape.h"
Shape::Shape()
{
}
Shape类最重要的就是生存了start和end两个点。为什么只要这两个点呢?因为我们要绘制的是直线和矩形。对付直线来说,有了两个点就可以确定这条直线,对付矩形来说,有了两个点作为左上角的点和右下角的点也可以确定这个矩形,因此我们只要生存两个点,就足够生存这两种图形的位置和巨细的信息。paint()函数是Shape类的一个纯虚函数,子类都必需实现这个函数。我们此刻有两个子类:Line和Rect,别离界说如下:
#p#分页标题#e#
line.h

#ifndef LINE_H

#define LINE_H

#include "shape.h"

class Line : public Shape

{

public:

 Line();

 void paint(QPainter &painter);

};

#endif // LINE_H
line.cpp
#include "line.h"
Line::Line()
{
}
void Line::paint(QPainter &painter)
{
painter.drawLine(start, end);
}
rect.h
#ifndef RECT_H
#define RECT_H
#include "shape.h"
class Rect : public Shape
{
public:
Rect();
void paint(QPainter &painter);
};
#endif // RECT_H
rect.cpp
#include "rect.h"
Rect::Rect()
{
}
void Rect::paint(QPainter &painter)
{
painter.drawRect(start.x(), start.y(),end.x() - start.x(), end.y() - start.y());
}
利用paint()函数,按照两个点的数据,Line和Rect都可以绘制出它们自身来。此时就可以看出,我们之所以要成立一个Shape作为父类,因为这两个类有险些完全相似的数据工具,而且从语义上来说,Line、Rect与Shape也完全是一个is-a的干系。假如你想要添加颜色等的信息,完全可以在Shape类举办记录。这也就是类条理布局的长处。
代码许多也会较量乱,附件内里是整个工程的文件,有乐趣的伴侣不妨看看哦!
出处:http://devbean.blog.51cto.com/448512/243546
本文配套源码