Information Technology and Electrical Engineering CSSE2010/CSSE7201 Assignment 2
信息技术与电气工程代写 Objective As part of the assessment for this course, you are required to undertake an assignment which will test you against some of
Due: 4:00pm (AEST) Friday October 28, 2022
Weighting: 20% (100 marks)
Objective
As part of the assessment for this course, you are required to undertake an assignment which will test you against some of the more practical learning objectives of the course. The assignment will enable you to demonstrate your understanding of
- C programming
- C programming for the AVR
- The Microchip Studio environment.
You are required to modify a program in order to implement additional features. The program is a basic template of the board game ‘Snakes and Ladders’ (a description is given on page 3).
For IN students:
the AVR ATmega324A microcontroller runs the program and receives input from a number of sources and outputs a display to an LED matrix, with additional information being output to a serial terminal and – to be implemented as part of this assignment – a seven segment display and other devices.
For EX students: 信息技术与电气工程代写
the AVR ATmega328P microcontroller runs the program and receives input from a number of sources and outputs a display to a serial terminal and – to be implemented as part of this assignment – a seven segment display and other devices.
The version of Snakes and Ladders provided to you has very basic functionality – it will present a start screen upon launch, respond to button presses or a terminal input ‘s’ to start the game. Then display the board for the game Snakes and Ladders with a player cursor that flashes on and off along with the starting square. End square and the snakes and ladders. You can add features such as moving the player, the snake and ladder functionality, dice rolling, timing, pausing, sound effects, etc. The different features have different levels of difficulty and will be worth different numbers of marks. Note that marks are awarded based on demonstrated functionality only.
Don’t Panic! 信息技术与电气工程代写
You have been provided with approximately 2000 lines of code to start with – many of which are comments. Whilst this code may seem confusing, you don’t need to understand all of it. The code provided does a lot of the hard work for you, e.g., interacting with the serial port and the LED display/serial terminal. To start with, you should read the header (.h) files provided along with game.c and project.c. You may need to look at the AVR C Library documentation to understand some of the functions used. Intro/getting started videos are available on blackboard, along with a video demonstrating some of the expected functionality to be implemented.
Academic Merit, Plagiarism, Collusion and Other Misconduct
You should read and understand the statement on academic merit, plagiarism, collusion and other misconduct contained within the course profile and the document referenced in that course profile. You must not show your code to or share your code with any other student under any circumstances. You must not post your code to public discussion forums or save your code in publicly accessible repositories. You must not look at or copy code from any other student. All submitted files will be subject to electronic plagiarism detection and misconduct proceedings will be instituted against students where plagiarism or collusion is suspected. The electronic plagiarism detection can detect similarities in code structure even if comments, variable names, formatting etc. are modified. If you copy code, you will be caught.
Grading Note 信息技术与电气工程代写
As described in the course profile, if you do not score at least 10% on this assignment (before any late penalty) then your course grade will be capped at a 3 (i.e. you will fail the course). If you do not obtain at least 50% on this assignment (before any late penalty), then your course grade will be capped at a 5. Your assignment mark (after any late penalty) will count 20% towards your final course grade.
Program Description
The program you will be provided with has several C files which contain groups of related functions. The files provided are described below. The corresponding .h files (except for project.c) list the functions that are intended to be accessible from other files. You may modify any of the provided files. You must submit ALL files used to build your project, even if you have not modified some provided files. Many files make assumptions about which AVR ports are used to connect to various IO devices. You are encouraged not to change these.
-
project.c
– this is the main file that contains the event loop and examples of howtimebased events are implemented. You should read and understand this file.
-
game.h/game.c
– this file contains the implementation of the board used to store the state of the game and the position of the player cursor. You should read this file and understand what representation is used for the board state and the cursor position. You will need to modify this file to add required functionality.
-
display.h/display.c 信息技术与电气工程代写
– this file contains the implementation for displaying the current state of the board. This file contains useful functions for displaying the board to the LED matrix (internal students) or the terminal display (external students). This file contains the same functions for IN and EX students but with significantly different implementations.
-
buttons.h/buttons.c
– this contains the code which deals with the push buttons. It sets up pin change interrupts on those pins and records rising edges (buttons being pushed). For EX students this code also handles button debouncing.
-
ledmatrix.h/ledmatrix.c (IN students only)
– this contains functions which give easier access to the services provided by the LED matrix. It makes use of the SPI routines implemented in spi.c
-
pixel_colour.h (IN students only)
– this file contains definitions of some useful colours. Colours are defined in terminalio.h for EX students.
-
serialio.h/serialio.c 信息技术与电气工程代写
– this file is responsible for handling serial input and output using interrupts. It also maps the C standard IO routines (e.g. printf() and fgetc()) to use the serial interface so you are able to use printf() etc for debugging purposes if you wish. You should not need to look in this file, but you may be interested in how it works and the buffer sizes used for input and output (and what happens when the buffers fill up).
-
spi.h/spi.c (IN Students only)
– this file encapsulates all SPI communication. Note that by default, all SPI communication uses busy waiting (i.e. polling) – the “send” routine returns only when the data is sent. If you need the CPU cycles for other activities, you may wish to consider converting this to interrupt based IO, similar to the way that serial IO is handled.
-
terminalio.h/terminalio.c
– this encapsulates the sending of various escape sequences which enable some control over terminal appearance and text placement – you can call these functions (declared in terminalio.h) instead of remembering various escape sequences. Additional information about terminal IO will be provided on the course Blackboard site.
-
timer0.h/timer0.c
– sets up a timer that is used to generate an interrupt every millisecond and update a global time value that is used to time various gameevents.
Snakes and Ladders Description 信息技术与电气工程代写
This assignment involves creating a replica of the board game ‘Snakes and Ladders’. Snakes and Ladders is a turn-based game played on a board between two or more players, however the template provided initially supports only one player. Each player takes their turn by rolling a (6- sided) dice to determine how many spaces to move their token forward. The board in the supplied base code features various snakes and ladders, which can either move a player closer to or further away from the end of the map. The winner is the first player to reach the final square.
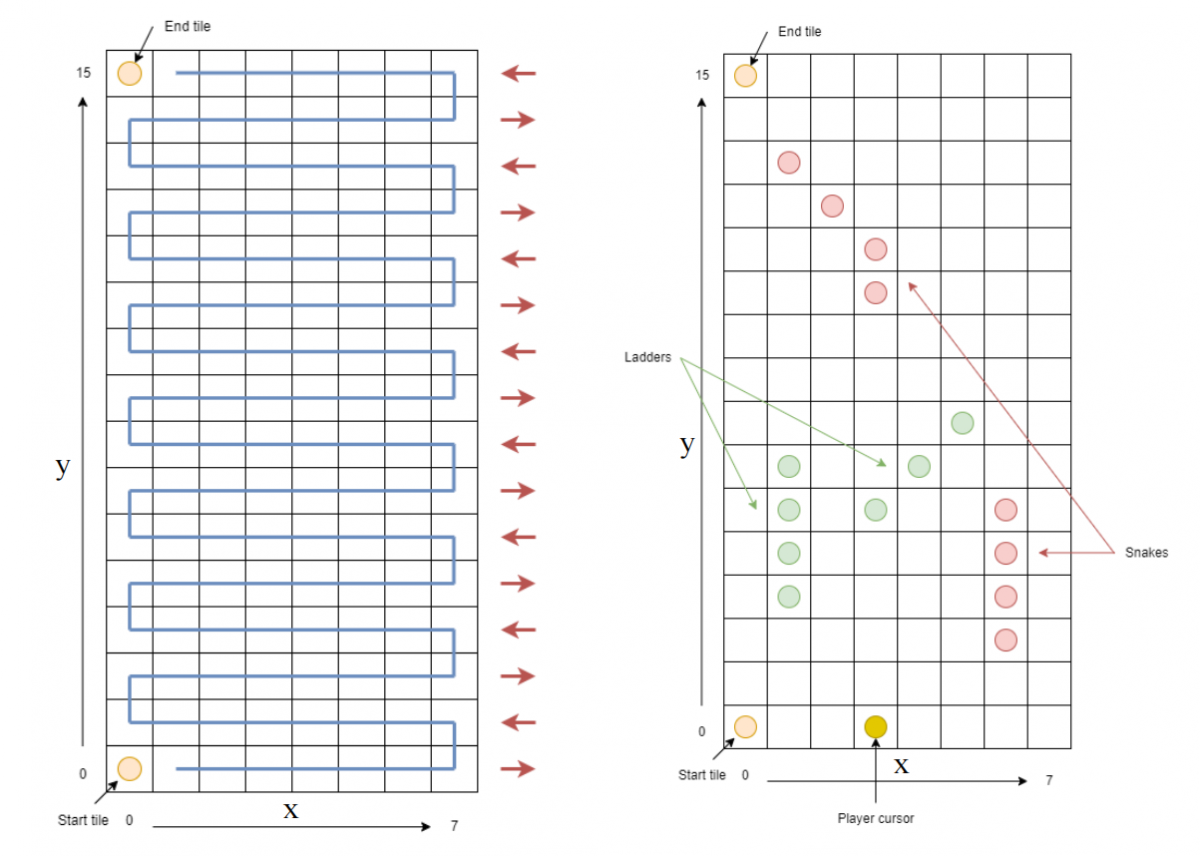
The board is arranged as below in an 8 column by 16 row layout (displayed on the LED matrix (IN) or serial terminal (EX)). Player’s move across each row, alternating direction each row.
Players start at the square (0, 0) and begin by moving towards the right.
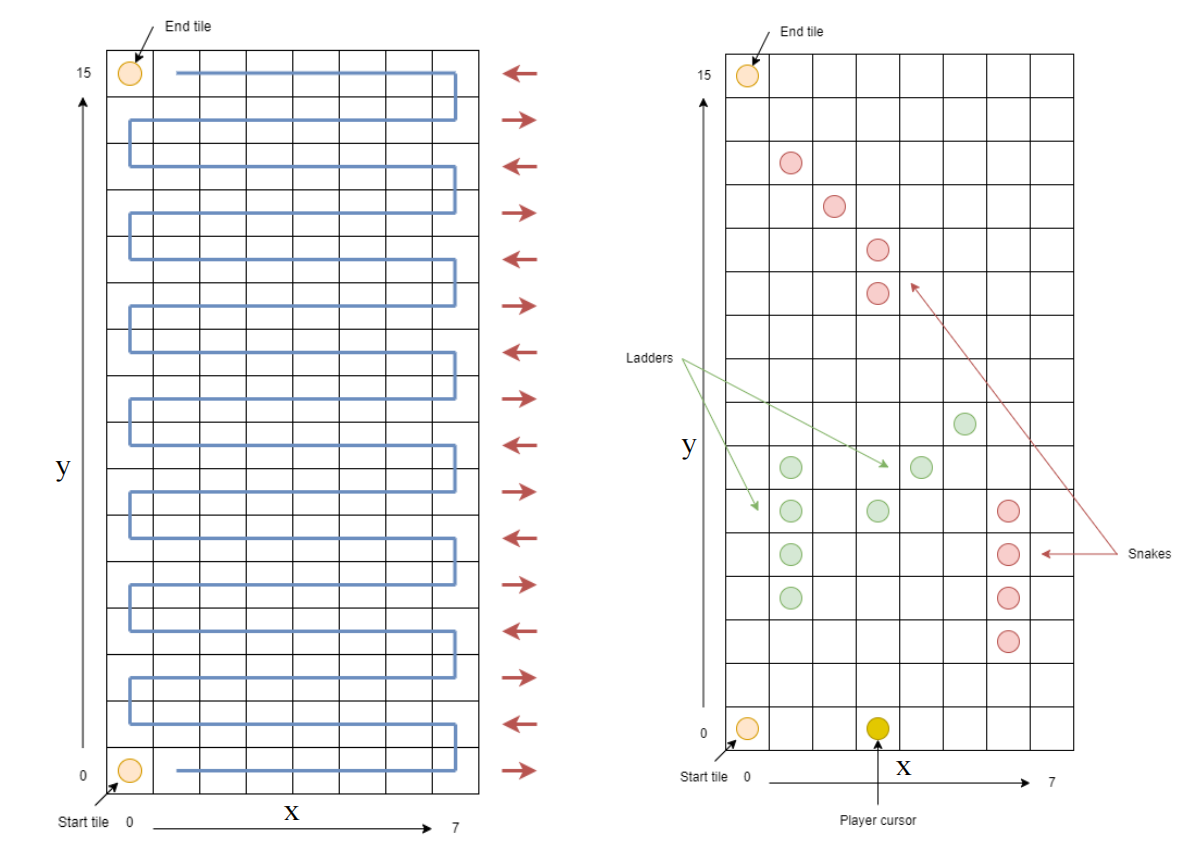
Figure 1: Left: direction the player moves across each row of the board. Right: Example layout with snake and ladder game elements included and labelled (different to the provided layout).
In addition to rolling a dice to progress across the board, players may move to different positions on the board by landing on the start of a snake or ladder. If the player moves on to the bottom position of a ladder. Then the player is automatically moved to the top of the ladder, moving them closer to the end tile. Snakes work the same way, however move the player from the top of the snake to the bottom, moving them away further from the final square.
Snakes and ladders are represented by coloured squares on the board, with snakes indicated in red and ladders indicated in green.
A brief overview of the behaviour of the snakes and ladders is shown in Figures 2 and 3.
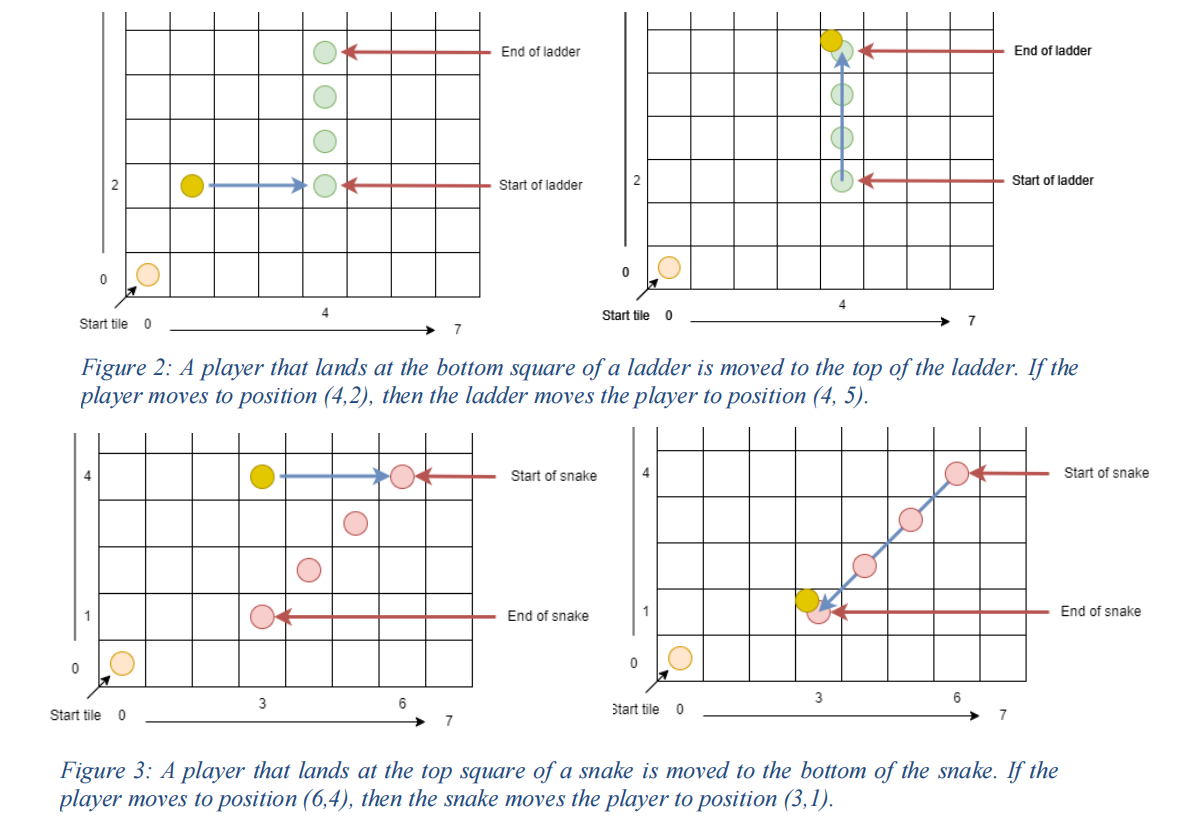
The snakes and ladders can be vertical, as shown for the ladder in Figure 2, or in other configurations, such as diagonal, as shown for the snake in Figure 3. The middle sections of snakes and ladders are allowed to cross (as in the layout of the supplied board), however a tile can only contain one start or end of a snake or ladder. Due to the limited colour options for the game displays, the start and locations of snakes and ladders are not differentiated, and therefore the start and tiles are visually identified by comparing the y coordinates.
Initial Operation
The provided program has very limited functionality. It will display a start screen which detects the rising edge on the push buttons B0, B1, B2 and B3, and also the input terminal character ‘s’. Pressing of any of these will start a game with the start configuration and a flashing cursor.
Once started, the program detects a rising edge on the button B0, but no action is taken on this input.
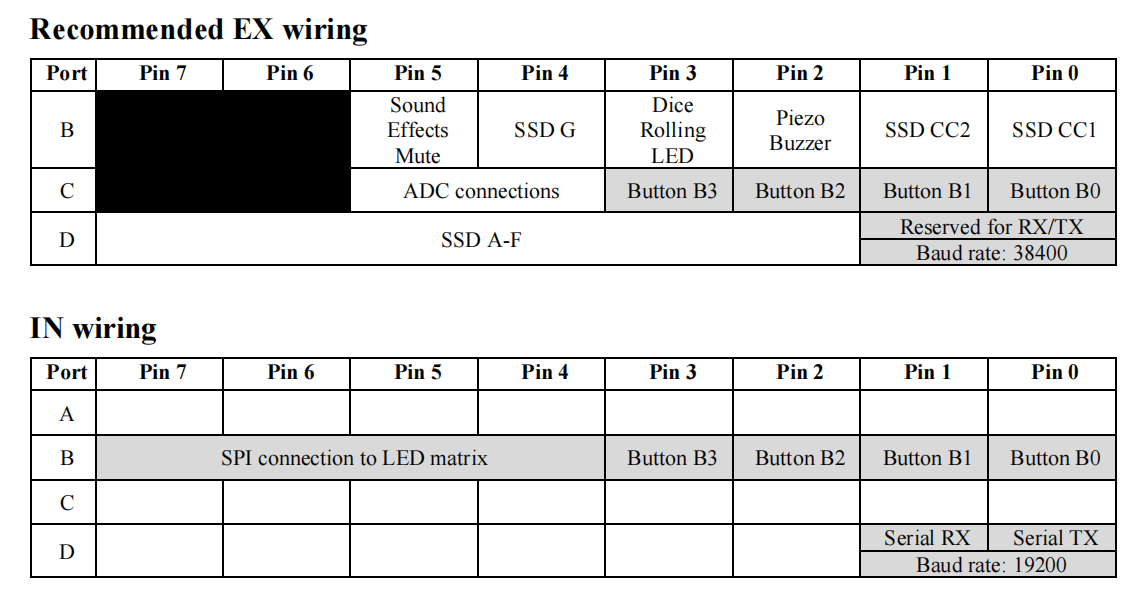
Wiring Advice 信息技术与电气工程代写
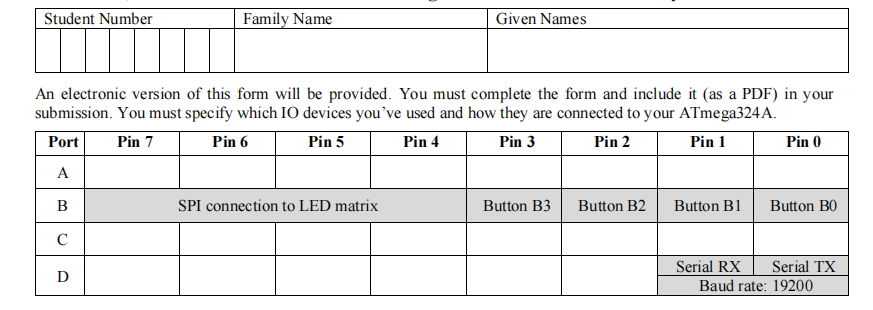
When completing this assignment, you will need to make additional connections to the ATmega324A/ATmega328P. To do this, you will need to choose which pins to make these connections to. For IN students, there are multiple ways to do this, so the exact wiring configuration will be left up to you, and you should communicate this using your submitted feature summary form. Hint: consider what peripherals each feature requires and any pin limitations this imposes.
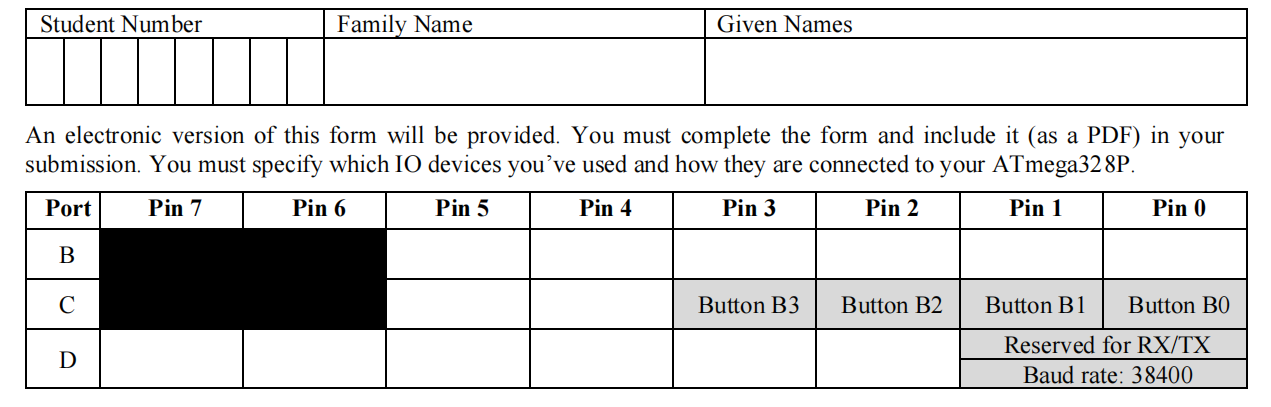
Due to the reduced number of external pins available with the Arduino Uno for EX students, all pins must be used to add all features and working out a valid configuration can be quite tricky. As a result, a configuration is provided below which you are encouraged to use to ensure everything fits. Note that pins D1 and D0 are the UART pins, which are being used to communicate to the serial terminal and no connections should be made to them (the Arduino board has inbuilt connections).
Program Features 信息技术与电气工程代写
Marks will be awarded for features as described below. Part marks will be awarded if part of the specified functionality is demonstrated. Marks are awarded only on demonstrated functionality in the final submission – no marks are awarded for attempting to implement the functionality, no matter how much effort has gone into it, unless the feature can be demonstrated. You may implement higher-level features without implementing all lower level features if you like (subject to prerequisite requirements). The number of marks is not an indication of difficulty. It is much easier to earn the first 50% of marks than the second 50%.
You may modify any of the code provided and use any of the code from learning lab sessions and/or posted on the course Blackboard site. For some of the easier features, the description below tells you which code to modify or there may be comments in the code to guide you.
NOTE: there is a pass hurdle of 10% for this assignment which can be achieved by completing the first two tasks (Start Screen and Move Player with Buttons).
Minimum Performance (Level 0 – Pass/Fail) 信息技术与电气工程代写
Your program must have at least the features present in the code supplied to you, i.e. it must build and run, show the start screen, and display the initial board when a button or ‘s’ is pressed. No marks can be earned for other features unless this requirement is met, i.e. your assignment 2 mark will be zero.
Start Screen (Level 1 – 4 marks)
Modify the program so that when it starts (i.e. the AVR microcontroller is reset) it outputs your name and student number to the serial terminal (for both IN and EX students). Do this by modifying the function start_screen() in file project.c.
Move Player with Buttons (Level 1 – 8 marks) 信息技术与电气工程代写
The provided program does not allow for the player token to be moved. Modify the program so that button B0 (connected to pin B0 for IN students, connected to pin C0 for EX students) moves the player one space forward and button B1 moves the cursor two spaces forward (useful to move past snakes/ladders in future tasks). Note that you will have to handle the direction of movement changing when the player reaches the end of the current row. The player should additionally not be allowed to move past the end tile shown in Figure 1. Note: for IN students, the axis of the game board are different to the labelled axis on the LED matrix. As shown in Figure 1, the x axis is the horizontal axis, the y axis is the vertical axis.
In the play_game()function in the file project.c, when button B0 is pressed, the function move_player_by(n) in the file game.c is called. This function is currently empty, start by filling in the move_player_by function, there are some hints to get you started and assist you with considering the changing movement direction. Then update play_game()to detect B1 and move the player accordingly.
Move Player with Terminal Input (Level 1 – 8 marks) 信息技术与电气工程代写
The provided program does not register any terminal inputs once the game has started. Modify the program such that pressing ‘w’/‘W’ moves the current player up one space, ‘s’/‘S’ moves the player down, ‘a’/‘A’ moves the player left and ‘d’/‘D’ moves the player right. Both the lower case and upper case of each letter must move the cursor. This functionality will be useful when testing other elements of the game. Instead of moving the player according to the normal rules, the player can be moved to arbitrary positions with the ‘wasd’/‘WASD’ keys.
In addition, the player must wrap around the display i.e. if the ‘s’/‘S’ key is pressed in row 0 the player should be moved to the top row (row 15).
On the start screen, the game can be started by pressing ‘s’ or ‘S’, looking at the function start_screen() should give you an idea of how to read serial input from the terminal. A function move_player(dx,dy) has already been defined with some hints to implement.
Note that if you press the directional arrows, they might also move your cursor in an unexpected direction, this is because they use escape characters that contain ‘A’ and ‘D’. We will not be considering escape characters when testing and will only use the letters of the alphabet, digits and spacebar as potential inputs.
Flashing Player Icon (Level 1 – 5 marks) 信息技术与电气工程代写
The supplied program contains code to flash the player pixel on and off every 500 ms to make the player icon more visible and when/if two player game is implemented, also help to distinguish the current player.
Modify the program so that moving the player restarts the flashing cycle i.e. the player should not flash until 500 ms after the cursor has been moved. Some code for this timing and flashing is provided in project.c.
Dice Rolling (Level 1 – 11 marks) 信息技术与电气工程代写
In addition to manually moving the player with the buttons, implement a ‘dice rolling’ mechanism to move the player a ‘random’ number (between 1 and 6 to simulate a 6-sided die) of spaces forward. One way to simulate a ‘random’ dice roll is to use a timer/counter setup to increment at a fast interval. The number of spaces to move is decided by the timer counter value when the dice rolling is stopped. You can also see the AVR C library reference for random number generation.
Note: the dice value must be a value between 1 and 6 (inclusive).
The dice roll begins by pressing Button B2 or the ‘r’/‘R’ key and is stopped when Button B2 or the ‘r’/‘R’ key is pressed again. Display the current state of the dice (whether it is currently rolling or not) on the terminal and, if the dice is rolling, also turn on an LED. The dice value should change between 10-20 times per second to give the appearance of randomness (this will be shown visually in the next task). If the dice has previously been rolled and is not currently rolling, the last rolled value should be shown on the display. If the dice has not yet been rolled, display ‘0’.
Also see the demo video for a preview of what this functionality should look like.
Seven Segment Display (Level 1 – 8 marks) 信息技术与电气工程代写
Output the current dice roll value and number of turns the game has lasted on the seven segment display. The number of turns (starting at 0 and incremented every time a move is made) should be shown on the left digit of the display. When the number of turns exceeds 9, this display should wrap around (i.e. the ‘ones place’ of the number of turns should be displayed at all times). Note the number of turns should only be incremented when the player is moved by the buttons or dice roll – the turn count should not increase when moving the player with the terminal input.
The dice roll should be shown on the right digit with the following rules: if the dice is currently being rolled, the current value should be shown on the seven segment display. If the dice has been previously rolled but is not currently rolling, the value of the last dice roll should be shown. If the dice has not yet been rolled, display ‘0’.
Snake and Ladder Functionality (Level 1 – 7 marks) 信息技术与电气工程代写
Implement the Snake and Ladder functionality, i.e. when a player lands at the top of a snake or the bottom of a ladder, the player should move to the opposite end of the snake/ladder. This will involve reading through game.c functions and comments to see how the snakes and ladders are implemented. The positions of the snakes and ladders are provided in the base code – this task involves detecting these objects and moving the player accordingly.
Briefly, each object on the game board is represented by an 8-bit integer, with the object type stored in the upper 4 bits and the identifier number (if applicable) is stored in the lower 4 bits. A snake or ladder is represented by a SNAKE_START/LADDER_START object with the same identifier number as a SNAKE_END/LADDER_END object. Therefore, if the player moves to a SNAKE_START/LADDER_START object, you can extract the identifier and search the board for the corresponding SNAKE_END/LADDER_END object.
The included get_object_type() and get_object_identifier() functions will be useful here.
Game Over (Level 1 – 7 marks) 信息技术与电气工程代写
Add functionality to detect if a player has won the game i.e. has reached the final square of the board (The player should stop at the final square even if the number of moves would move the player past the final square). If a win is detected then a message should be shown on the terminal indicating which player has won the game. A new game should be able to be started after the game has ended (by pressing any button or using the ‘s’/‘S’ key). Some of this code has already been provided for you in project.c/game.c.
Two Player Game (Level 2 – 8 marks)
Add support for a two player game, selectable by pressing ‘2’ before the game begins (a one player game should be able to be selected by pressing ‘1’ and should be the default). In a two player game, the current player will switch after a move is made (either by the fixed-space movement buttons, moving the player with the terminal/keyboard inputs or with a dice roll).
Player 2 should be displayed using a different colour to distinguish from player 1. Several (unused) colours have been provided in pixel_colour.h (IN) /terminalio.h (EX) or you can additionally define your own colours.
Custom Game Board (Level 2 – 7 marks) 信息技术与电气工程代写
Modify the program to support multiple different game boards. Before starting a new game, toggle between the original and custom game boards by pressing the ‘b’/‘B’ key. A message should be shown on the terminal indicating which map has been selected (even if the board has not been toggled i.e. always show the current board number to be used). The map selection should be able to be updated at game over as well (if game over has been implemented). The custom map should be of similar complexity to the original map (i.e. it should contain at least as many snakes/ladders as the original and should not be a trivial design).
Game Timing (Level 2 – 6 marks)
Add the ability to toggle between different difficulties with different times for players to make moves. There are 3 difficulties – easy, medium and hard.
- Easy difficulty has no time limit and is the default game behaviour.
- Medium difficulty has a time limit of 90 seconds per player.
- Hard difficulty has a time limit of 45 seconds per player.
When playing one of the timed difficulties, each player has a fixed amount of time to win the game. If either player runs out of time then they forfeit the game and the other player is declared the winner.
During a timed game, 信息技术与电气工程代写
The time remaining should be displayed for the current player on the terminal. The remaining time must count down and should show the remaining time in seconds for each player when the remaining times is 10+ seconds. When the remaining time is less than 10 seconds, the remaining seconds and tenths of seconds should be shown.
The game difficulty may be changed at any point by pressing:
- ‘e’/’E’ – select easy difficulty
- ‘m’/’M’ – select medium difficulty
- ‘h’/’H’ – select hard difficulty
When the difficulty is changed the timer is reset to the original time i.e. you do not have to remember the remaining time when switching difficulties.
Game Pause (Level 2 – 6 marks) 信息技术与电气工程代写
Modify the program so that if the button B3 or ‘p’/‘P’ key on the serial terminal is pressed then the game will pause. When ‘p’ or ‘P’ key on the serial terminal is pressed again, the game recommences. (All other button/key presses/inputs should be discarded whilst the game is paused – i.e. the player cannot be moved.) The player cursor flashing must be unaffected – e.g. if the pause happens 200ms before the player cursor is going to flash off, then the player cursor should not flash off until 200ms after the game is resumed, not immediately upon resume. Other functionality such as the seven segment display should be unaffected i.e. both digits of the seven segment display should still be shown (without ghosting etc.) if implemented.
Visual Effects (Level 3 – 5 marks)
(This assumes that you have implemented “Snake and Ladder Functionality” above.)
Implement visual animations on the display when certain game events occur. These animations must involve multiple pixels and must not only change the colour of game elements (i.e. there must be a timing element to the effects). Implement visual animations for the following events:
- When the player lands on a snake or ladder, show the player moving up/down the ladder/snake.
- When the player moves, show the individual spaces being moved.
- When the game is won.
If the game is paused during an animation, the animation should pause instantly and resume when the game is unpaused.
Sound Effects (Level 3 – 5 marks) 信息技术与电气工程代写
Add sound effects to the program which are to be output using the piezo buzzer. Different sound effects (tones or combinations or tones) should be implemented for at least three events. (At least one of these must be sequences of tones for full marks.) For example, choose three of:
- Player being moved
- Player landing on a snake
- Player landing on a ladder
- Game start-up
- Game over
- Constant background tune
Do not make the tones too annoying! Pressing the ‘q’ or ‘Q’ key on the serial terminal must be used to toggle sound on and off, sound should be on when the game starts. You must specify which AVR pin the piezo buzzer must be connected to. (The piezo buzzer will be connected from there to ground.)
Your feature summary form MUST indicate which events have different sound effects. Sounds must be tones (not clicks) in the range 20Hz to 5kHz. Sound effects must not interfere with game play, e.g. the speed of play should be the same whether sound effects are on or off.
Joystick (Level 3 – 5 marks) 信息技术与电气工程代写
Add support to use the joystick to move the player left, right, up and down. This must include support for auto-repeat – if the joystick is held in one position then, after a short delay, the code should act as if the joystick was repeatedly moved in that direction. If a player is moved onto a snake or ladder with the joystick, the turn should switch immediately after the player moves up/down the snake or ladder. You may also wish to include a small delay after the player changes before the joystick moves the player again.
If multiple axis of the joystick are activated the cursor should move diagonally. Your movement must be reasonable – i.e. a reasonable player could stop at whichever space they desired. Your cursor must be shown to move through all positions and be able to be stopped at that position if the joystick is released. Be sure to specify which AVR pins the U/D and L/R outputs on the joystick are connected to.
Be aware that different joysticks may have different min/max/resting output voltages and you should allow for this in your implementation – your code will be marked with a different joystick to the one you test with. For external students, this will be marked more leniently as your joystick likely differs more substantially.
Scrolling Map Display (Level 3 – 5 marks)
Extend the size of the game board beyond the inital 8×16 display to 8×24. This will involve extending the original map and any custom map you have implemented. Since the larger map exceeds the size of the display, the display will need to scroll to always keep the current player visible (though it may be possible for the other player, if implemented, to be outside of the display). The display should scroll smoothly, i.e. the scroll should occur one row at a time.
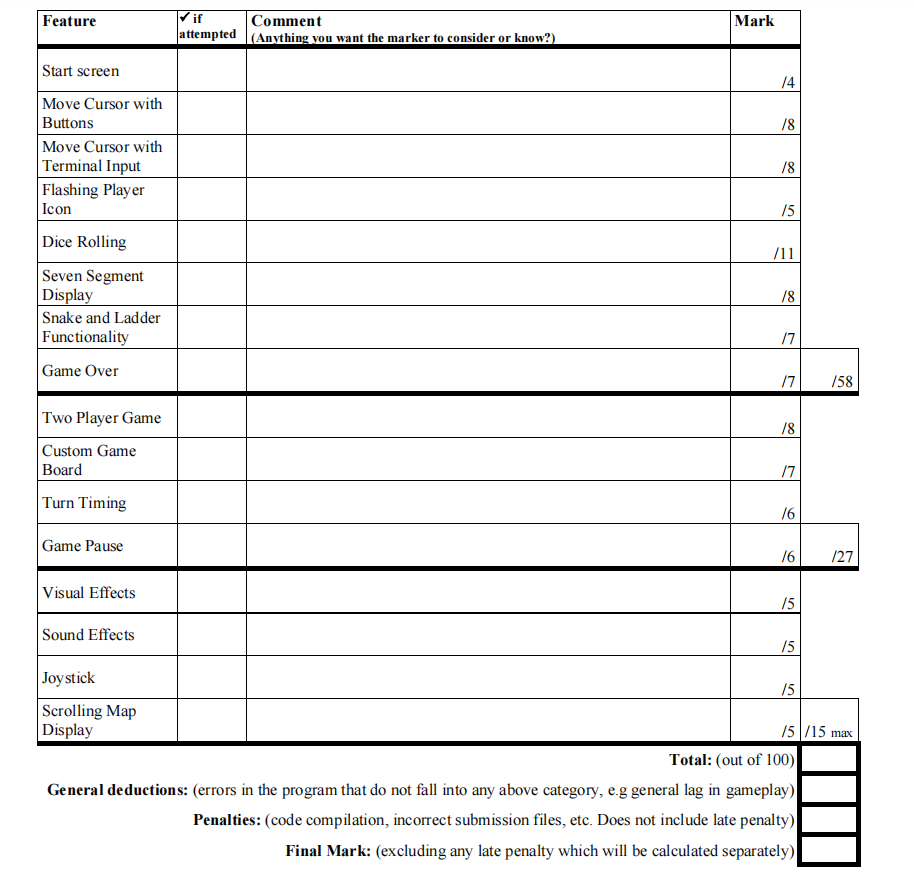
Assessment of Implementation of Features 信息技术与电气工程代写
The program improvements will be worth the number of marks shown above. You will be awarded marks for each feature up to the maximum mark for that feature. Part marks will be awarded for a feature if only some part of the feature has been implemented or if there are bugs/problems with your implementation. (which may include issues such as incorrect data direction registers). Your additions to the game must not negatively impact the playability or visual appearance of the game. Note also that the features you implement must appropriately work together, for example, if you implement game pausing then sound effects should pause.
Features are shown grouped in their levels of approximate difficulty (level 1, level 2, and level 3). Note that maximum marks for level 3 features are capped at 15, as indicated in the feature summary forms at the end of this document.
Submission Details 信息技术与电气工程代写
The due date for the assignment is 4:00pm Friday 28 October 2022. The assignment must be submitted via Blackboard. You must electronically submit a single .zip file containing ONLY the following:
- All of the C source files (.c and .h) necessary to build the project (including any that were provided to you – even if you haven’t changed them);
- Your final .hex file (suitable for downloading to the ATmega324A/ATmega328P AVR microcontroller program memory, see the getting started videos to locate the hex file); and
- A PDF feature summary form (see below).
Do not submit .rar or other archive formats – the single file you submit must be a zip format file. All files must be at the top level within the zip file – do not use folders/directories or other zip/rar files inside the zip file. If only the .hex file is submitted with no source files then your submission will not be marked. The .hex file will be used if the marker is unable to compile/build the submitted source files.
If you make more than one submission, each submission must be complete – the single zip file must contain the feature summary form, the hex file and all source files needed to build your work. We will only mark your last submission and we will consider your submission time (for late penalty purposes) to be the time of submission of your last submission. 信息技术与电气工程代写
It is the responsibility of the student to ensure that their submission is correctly uploaded to the Blackboard submission portal with all of the files they intend to submit. This can be ensured by downloading your zip file after submission is made, un-zipping the submission to check all files are correctly included and checking whether you are able to compile the project successfully.
The feature summary forms are on the last pages of this document,
There is a separate feature summary form for IN and EX students. A separate electronically-fillable PDF form will be provided on Blackboard. This form can be used to specify which features you have implemented and how to connect the ATmega324A/ATmega328P to peripherals so that your work can be marked. If you have not specified that you have implemented a particular feature, we will not test for it. Failure to submit the feature summary with your files may mean some of your features are missed during marking (and we will NOT remark your submission). You can electronically complete this form or you can print, complete and scan the form. Whichever method you choose, you must submit a PDF file with your other files. If you have any assumptions or comments to convey to the marker, include these on the feature summary form.
Incomplete or Invalid Code 信息技术与电气工程代写
If your submission is missing files (i.e. won’t compile and/or link due to missing files) then we will substitute the original files as provided to you. No penalty will apply for this, but obviously no changes you made to missing files will be considered in marking.
If your submission does not compile and/or link in Microchip Studio version 7 for other reasons, then the marker will make reasonable attempts to get your code to compile and link by fixing a small number of simple syntax errors and/or commenting out code which does not compile. A penalty of between 10% and 50% of your mark will apply depending on the number of corrections required. If it is not possible for the marker to get your submission to compile and/or
link by these methods then you will receive 0 for the assignment (and will have to resubmit if you wish to have a chance of passing the course). A minimum 10% penalty will apply, even if only one character needs to be fixed.
Compilation Warnings 信息技术与电气工程代写
If there are compilation warnings when building your code (in Microchip Studio, with default compiler warning options) then a mark deduction will apply – 1 mark penalty per warning up to a maximum of 10 marks. To check for warnings, rebuild ALL of your source code (choose “Rebuild Solution” from the “Build” menu in Microchip Studio) and check for warnings in the “Error List” tab.
General Deductions
If there are problems in your submitted assignment that do not fit into any of the above feature categories, then some marks may be deducted for these problems. This could include problems such as general lag, errors introduced to the original program etc.
Late Submissions 信息技术与电气工程代写
As per the ECP, late submissions (i.e. submitted after 4:00pm AEST Friday 28 October 2022) will result in a penalty. A late penalty of 10% of the maximum possible mark for the assessment item will be deducted per calendar day (or part thereof), up to a maximum of seven (7) days. After seven days, no marks will be awarded for the item. A day is considered to be a 24-hour block from the assessment item due time. Negative marks will not be awarded.
Requests for extensions should be made via the process described in the course profile (before the due date). And be accompanied by documentary evidence of extenuating circumstances (e.g. medical certificate or personal statement). The application of any late penalty will be based on your latest submission time.
Notification of Results
Students will be notified of their results via Blackboard’s “My Grades”.
The University of Queensland – School of Information Technology and Electrical Engineering Semester 2, 2022 – CSSE2010 / CSSE7201 Assignment 2 – Feature Summary EXTERNAL